Family Farm

Family Farm
Showing posts with label Kitchen. Show all posts

Tuesday, March 13, 2012

Winter Potpourri Recipes & More...

Pine cone potpourriSpice up your hospitality and generosity this winter with a few festive potpourri fragrances.
Use all-natural ingredients to combine the scents of the season and fill the air with cheer.

Pine Cone Potpourri

The holiday season is a perfect time to make potpourri for your home or for gifts. Try this simple and festive recipe from A World Of Plenty:
Ingredients:
8 pounds of pine cones
3/4 ounce bayberry fragrance oil
1/4 ounce cinnamon fragrance oil
1/4 ounce clove fragrance oil
1/4 ounce orange fragrance oil
Fill a trash bag a little over half full with pine cones. Drop the oils in over the cones, and mix them in the bag so that the oils are distributed evenly over all the cones. Fasten the top of the trash bag and leave the pine cones for a couple days to pick up the scent of the blended oils.
You can add cinnamon sticks, pine boughs and flower pedals to the mix to add more fragrance and color to the potpourri.
“Display in decorative baskets or bowls along with, for color and variety, long cinnamon sticks, tangerines orpomegranates, cedar tips, or your own cut evergreen tips. Or keep by the fireplace and toss in for a quick burst of scent.”

Holiday Herbs

This potpourri recipe from the Herb Companion is a little more intensive than the pine cone recipe, but it makes a potpourri from dry ingredients, which creates a “mild, sweet, almost candylike scent.”
Ingredients:
4 cups of rose petals
2 1/2 cups lavender flowers
2 cups each anise hyssop flowers, flowering tops of peppermint, pink rosebuds, oakmoss, and sweet woodruff leaves
1/2 cup each allspice berries, aniseed, and cloves
1 cup each cinnamon chips, rosemary (or substitute pine or fir needles), holy basil tops (or substitute sweet Annie or increase the aniseed), and chopped calamus root
1 vanilla bean, chopped in 1/4-inch pieces
1/2 teaspoon tangerine fragrance oil
1/4 teaspoon cinnamon fragrance oil
1/4 teaspoon pine or fir fragrance oil
Combine the dry ingredients together and stir them gently until mixed, then add the fragrance oils the the mixture. Let the mixture rest in sealed jars for at least two weeks.
Display your potpourri in a large glass jar or a basket, or give your potpourri as a gift in a jar or tin. You can also fill sachets with your potpourri to spread the scents in your closets and drawers.

Dill Pickle Chips

http://www.facebook.com/thehenbasket2

Dill Pickle Chips


3/4 to 1 cup of beer
2 eggs
1 -2 cups of flour
Cholesterol free oil
...

Pour oil in a large skillet until the oil is about 1-2 inches up the side of the pan. Heat oil to 350 degrees.

Strain pickles in a small colander.

In a mixing bowl, whisk the yolks and 3/4 cup of the beer. Season the mixture with salt and pepper. Whisk in enough flour to form a batter. If the batter is too thick add the remaining beer to thin the batter.

Dip pickles one at a time using tongs into the batter and then place in the heated oil.

Fry pickles for about 2 minutes flipping the pickle after about 1 minute.

Place pickles on a plate lined with paper towel and then season with salt. Serve with Ranch Dressing.

photo and recipe~http://elizabethsedibleexperience.blogspot.com/

Fresh Homemade Mozzarella cheese – In 30 Minutes

http://www.commonsensehome.com/fresh-homemade-mozzarella-cheese-in-30-minutes/


Fresh, Homemade Mozzarella Cheese

I recently decided to try my hand at home cheese making with friends, and it came out delicious!  I’ve been making yogurt cheese and kefir cheese, which simply require straining the yogurt of kefir, but this was my first “real” cheese.
I used the “30 Minutes Mozzarella Cheese” recipe from Ricki Carrol’s book “Home Cheese Making“.  Ricki also features this recipe on her website at http://www.cheesemaking.com/howtomakemozzarellacheese.html.

Fresh, Homemade Mozzarella in 30 Minutes

Ingredients
1 1/2 level teaspoons citric acid dissolved in 1/2 cup cool water
1 gallon pasteurized whole milk (raw milk from a safe source or even powdered milk may be used – see Ricki’s site for directions)
1/4 teaspoon liquid rennet (or 1/4 rennet tablet) diluted in 1/4 cup cool, unchlorinated water
1 teaspoon cheese salt (optional)
Directions
1.  Gently bring the milk up to 55 degrees F in a large, stainless steel pot.  While stirring, add the citric acid solution to the milk at 55 degrees F and mix thoroughly.
Note:  You may use skim milk, but the yield will be lower and the cheese will be drier.
2.  Heat the milk to 90 degrees over medium-low heat, stirring constantly. Remove the pot from the heat and gently stir in the diluted rennet with an up-and-down motion for 30 seconds. Cover the pot and leave undisturbed for five minutes.
3.  Check the curd.  It should look like custard, with a clear separation between the curd and why.  (If the curd is too soft or the whey is too milky, let set for a few more minutes.)  Cut the curd with a knife that reaches all the way to the bottom of your pot.
4.  Place the pot back on the stove and heat the curds to 105F, gently moving the curds around with your spoon. (Note:  If you wish to make this cheese without a microwave, directions can be found here.)  Remove from heat and continue to stir slowly for 2 to 5 minutes.  (Stirring for 5 minutes will result in firmer cheese.)
5.  Scoop out the curds with a slotted spoon and put into a 2 quart microwaveable bowl.  Press the curds gently with your hands, pouring off as much whey as possible.  Reserve the whey.  (You can use it to make ricotta cheese.)
6.  Microwave the curds on high for 1 minute.  Drain off all excess whey.  Gently fold the cheese over an over (as in kneading bread) with your hands or a spoon.  This distributes the heat evenly throughout the cheese, which will not stretch until it is too hit to touch (145F inside the curd).  Rubber kitchen gloves are very handy at this stage.  To make this cheese without a microwave, visit Ricki’s site.
7.  Microwave two more times for 35 seconds each; add salt to taste after the second time. After each heating, knead again to distribute the heat.
8. Knead quickly until it is smooth and elastic. When the cheese stretches like taffy, it’s done. If the curds break instead of stretch, they are too cool and need to be reheated.
9. When the cheese is smooth and shiny, roll it into small balls and eat while warm. Or place them in a bowl of ice water for half an hour to bring the inside temperature down rapidly; this will produce a consistent smooth texture throughout the cheese. Although best eaten fresh, it can be stored in the refrigerator at this point.
Note: If you are using store-bought milk, and your curds turn into the consistency of ricotta cheese and will not come together, switch brands of milk. It may have been heated at the factory at too high a temperature.
Yield:  3/4 to 1 pound from 1 gallon milk
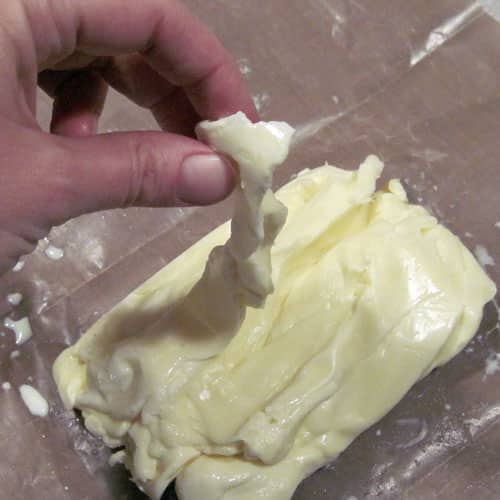
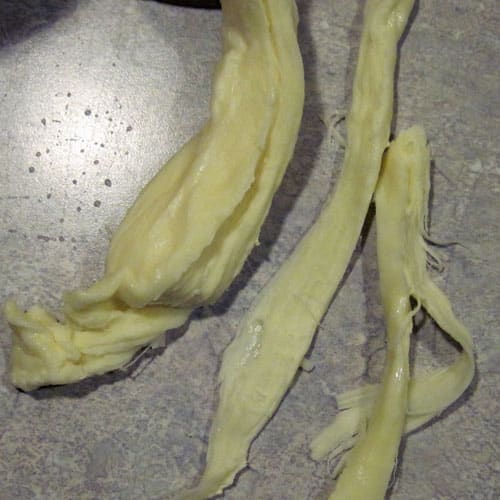
Update:  After experimenting a bit more, I found you can also pull this into strips or strings (think “homemade string cheese”).  Pull the strips, drop them in the water to cool, then pack them tightly in a pyrex container or wrap in plastic wrap (I prefer pyrex).  They’re not as pretty as the store bought ones, but they work just the same.
homemade string cheesehomemade string cheese recipe
Although the original recipe recommended storing the cheese in water, I prefer storing it in a tightly sealed container without water. Water storage makes the cheese soft and washes out the salt.

Ricotta From Heaven

(also from Home Cheese Making)
Ingredients
Fresh whey, no more than 3 hours old, left over from making hard cheese
Directions (other options available at http://www.cheesemaking.com/store/pg/217-Ricotta.html)
1.  Heat the whey in a pot until foam appears,  This usually happens just prior to boiling; if the mixture boils, it will taste burned.
2.  Turn off the heat; let the whey set for 5 minutes.
3.  Gently skim off the foam and place the whey in a colander lined with butter muslin.
4.  Let drain for 15 minutes, then refrigerate.  This ricotta will keep for up to one week in the refrigerator.
Yield:  About 1/2 pound per gallon of whey
*Note – I later read that the 30 minute mozzarella whey is not recommended for making ricotta (it says this in the cheesemaking kits), but mine works just fine.  I’m glad I didn’t read that I wasn’t supposed to do it before I did it.
We ate one batch of mozzarella fresh, and then I made more to put on homemade pepperoni pizza.  :-)   It was delicious.
The ricotta was lovely, too.  Very smooth and creamy, and just a tiny bit sweet.  I think it would be great in homemade lasagna.  The leftover whey can be used for fermenting vegetables, such as beet kvass, or you can chill it and add some flavored drink mix for a nourishing beverage.  My kitties like to drink it plain.  I warm it up for them on cold mornings.
I’m looking forward to trying other cheese recipes, but these were great ones to start with – very quick and easy.
Another family favorite that may be even easier, although it takes a bit longer, is fromage blanc.  Fromage blanc is a soft white cheese that is great as a spread or dip.  (Or for topping spuds – yum!)  It can also be used in cooking.The recipe only has five steps – that’s it!  Learn how to make fromage blanc in this post.

Produce You Should Never Put In The Fridge

Check out this article for more info: http://www.huffingtonpost.com/2012/03/09/dont-refrigerate-these_n_1335168.html


Monday, March 12, 2012

Quick Orange Peel Vinegar Cleaner!

Orange peels, vinegar in a quart jar, let sit for 10 days or so...strain out the liquid and use as an all-purpose cleaner. Easy, cheap, natural, smells good!
 

Garlic: {Kitchen Q&A}

http://tipnut.com/garlic-answers/

This week’s Kitchen Questions & Answers is all about garlic: Do you know the difference between garlic powder and garlic salt or how to quickly peel a lot of garlic cloves quickly? Would you like to learn how to make your own garlic salt? Or how about a handy kitchen tip for removing garlic smell from your hands or how to fix a cooked dish that has too much garlic in it? These questions and more are answered below…
A Bulb Of Garlic With Peeled Cloves
  1. What are some garlic equivalents? 1 medium clove garlic = 1 teaspoon minced garlic = 1/2 teaspoon garlic salt = 1/4 teaspoon granulated garlic = 1/8 teaspoon garlic powder. (see note below about garlic clove size–halve if small clove, double if large clove).
  2. What does a clove of garlic equal minced? 1 small clove = 1/2 teaspoon minced; medium clove = 1 teaspoon minced; large clove = 2 teaspoons minced (these are approximate measurements).
  3. How should garlic bulbs be stored? Garlic should be kept cool with good air circulation (don’t refrigerate it and don’t lock it up tight in a plastic container). Keep a bulb or two in a small bowl or basket on the kitchen counter if you use it daily, the rest can be stored in a basket in a cool, dark pantry to help the garlic last longer.
  4. How can I store minced garlic? Put it in a small glass jar then cover with olive oil and refrigerate (use within the week). If you want to make big batches of minced garlic you can freeze the batch by putting it in a small ziploc freezer bag, patting the garlic down into a thin thickness and to remove all the air, then freezing it. Remove frozen pieces of minced garlic as you need by breaking off a chunk.
  5. Can you freeze whole bulbs of garlic? Yes you can! Freeze whole, unpeeled bulbs of garlic in a freezer bag then remove cloves as you need. You can also separate the cloves before freezing or place peeled cloves in an empty icecube tray, cover each with olive oil, freeze, then pop them out and freeze in a large bag or airtight container–grab a cube when you need it.
  6. How do I fix too much garlic in my recipe/dish? Mix 1 teaspoon of sugar with two teaspoons of vinegar then mix with 1 tablespoon + 1 teaspoon of water. Mix well then SLOWLY add to your cooked dish until you find an agreeable level of garlic taste. Just mix this in a little at a time since you may not need much!
  7. How do you roast garlic? Roasting garlic is very easy to do and it’s delicious in mashed potatoes, on meat and vegetables, slathered on bread and used in many other dishes. To roast garlic, see How To Roast Garlic & Recipe Tips.
  8. Is there a way to make my own garlic salt? Sure! Homemade Garlic Salt: Grind dried garlic in a food processor until it’s a fine powder, measure then add 4 parts salt to one part garlic powder and mix for 2 seconds. Store in an airtight container.
  9. What is elephant garlic? Elephant garlic is a lot bigger than regular garlic but its taste is more subtle. If you prefer a hint of garlic taste in recipes rather than the full flavor, try substituting regular garlic with elephant garlic. Did you know elephant garlic is actually from the leek family? Source: Growing Garlic: Tip Sheet.
  10. What’s the difference between granulated garlic and garlic powder? Granulated garlic has a coarser consistency/texture than garlic powder but they’re both made from ground, dehydrated garlic.
  11. What’s the difference between garlic powder and garlic salt? Garlic powder is ground, dehydrated garlic and garlic salt is garlic powder with salt added. If you wanted to substitute garlic salt for garlic powder in a recipe, you can do so but be careful about adding any more salt to the dish (taste first). If you want to substitute garlic powder for garlic salt, reduce the amount and add a bit of salt–you’ll have to do this by taste. See the equivalents listed at the top.
  12. What’s the difference between a bulb of garlic and a clove of garlic? The garlic bulb is the whole garlic “plant” while cloves of garlic are the individual garlic pieces found within the bulb.
  13. Any tips for removing garlic smell from hands? Here’s a few: Remove the smell of garlic from hands by rubbing your fingers over a stainless steel spoon (from More Kitchen Tip Quickies). You can also rub a couple crushed crackers between your hands to remove the smell.
  14. How do you peel garlic cloves? For big batches dunk garlic cloves for about 10 seconds in boiling water then strain and dunk in ice cold water. The cloves should pop out of their skins easily. If it’s just a few cloves you need to peel, cut off one end of the garlic then peel off the skin with the blade of the knife. If the recipe calls for minced or crushed garlic, just smash the clove with your knife and you’ll be able to pick out the skin easily.

25 Cooking & Baking Tips – Timeless Wisdom Collection

http://tipnut.com/25-cooking-baking-tips/

These tips for cooking and baking are from a large collection of tips I’ve gathered together from a variety of books and magazines from the 1940s and 1950s…most of these are quite unique I think since I don’t recall coming across them before.
  1. Cooking & Baking Tips - Tipnut.comSift flour as it is being emptied into the container. As most recipes call for sifted flour, this will save much time.
  2. Ease graham cracker crusts from the pan by dipping the pie pan in hot water before slicing and serving.
  3. Keep a tin of orange concentrate opened in your fridge and ready for use. Sneak a spoonful into your sweet sauces, icing for cakes, lemon cake mix, fresh salads and ever so many recipes and watch them take on a tang.
  4. Red cabbage will keep its red color if cooked with a bit of vinegar added to the water; add when cabbage is partially cooked.
  5. French toast is made crisper by adding a tablespoon of flour to the egg and milk mixture.
  6. Instead of deep frying croquettes, place them in a greased pan and bake; just as good and much more digestible.
  7. Bacon drippings are valuable–save them. Use as seasoning for vegetables; as a basis for soups and white sauces; to add meat flavor to scalloped dishes; for frying eggs, French toast, potatoes, etc.
  8. A dash of ginger added to chocolate icing gives a delicious, unusual flavor.
  9. Juice from pickled fruits such as crab apples, peaches and pears is wonderful for basting smoked ham.
  10. For a variation in meat balls, add chopped apple to ground meat along with other seasoning, roll into small balls and simmer in tomato puree, seasoned with sage.
  11. Boiled icing will keep soft if a scant teaspoon of vinegar is added with the flavoring.
  12. Add one of the following to the room temperature egg whites for the highest meringue: add a pinch of baking powder; add a pinch of salt; add a generous pinch of baking soda.
  13. A teaspoon of celery salt added to cracker crumbs in which oysters are rolled before frying improves their flavor.
  14. If you can’t find either fresh or dried dill, use 2 or 3 tablespoons of dill seed to each quart of pickles.
  15. When you get through with a tea ball, empty and clean it, then use it to hold onion or other seasoning for flavoring soups and stews.
  16. Something new in frosting! For a white or yellow cake, put 2/3 cup chopped dried apricots (well washed) in the frosting. Flavor with 1/4 teaspoon each of almond and lemon extract as well as the usual teaspoon of vanilla.
  17. If whipping cream won’t thicken, add some instant vanilla pudding powder.
  18. Heavy muffin papers set in muffin tins make excellent gelatin molds. Serve in papers or remove by placing muffin tins in warm water for a few minutes. Top with a cherry or peach slice.
  19. A little crushed or diced pineapple is delicious added to savory stuffing used for roast.
  20. Pastry will be flakier if you include 1 tblsp. orange or lemon juice as part of your liquid.
  21. Diced fruits for salad or desserts can be kept from turning dark by covering them with grapefruit juice.
  22. Once an onion has been cut in half, rub the left-over side with butter and it will keep longer.
  23. Leftover onion will keep much longer then the root is left intact – use top part first.
  24. Leftover eggnog makes a lovely sauce for vanilla ice cream or cake. And mixed with rice, it makes a tasty rice pudding. Just substitute it for the milk in your recipe.
  25. Popcorn should always be kept in the freezer. Not only will it stay fresh, but freezing helps eliminate “old maids”.
More Tips:

Sunday, March 11, 2012

Leaving Your Fresh Eggs Out to Enjoy!!!

Don't hide your pretty eggs in the frig. Leave them right out on the counter in a basket or bowl. As long as you don' wash them (the natural 'bloom' is what keeps out air and bacteria), they will keep for several weeks unrefrigerated. If you're unsure if they're still safe to eat, just pop one into a glass of water. Toss any floaters, the rest are fine.
 
 
And folks, don't "wash" your eggs with mineral oil or other cleaners. Eggs are very porous and will absorb easily. If they are dirty, a little warm water and a bit of olive oil will keep them nice. Whatever you put on them will absorb into the egg! They have their own natural protectant with the shell :) (Trish)

Chicken Salad Seed Mix ~ For Your Chickens!!!


"Our seed kit is for those of you who love to spoil your flock. Sow the seeds and, 4 to 8 weeks later, let your flock loose on them -- these are p...lants chickens especially love to eat! You can also plant them in containers and clip the greens for your flock. Contains: Dwarf Essex Rape, Purple Top Turnip, Bracco White Mustard, Forage Kale, Landino Clover." - My Pet Chicken

Purchase MPC "Chicken Salad" seed mix here: http://www.mypetchicken.com/catalog/chickens/Chicken-Salad-Seed-Mix-p928.aspx

Chicken Broth Muffin Cups - Not What You Think!

http://nomadichomestead.com/chicken-broth-muffin-cups/


Chicken Broth Muffin Cups Chicken Broth Muffin Cups are one of the easiest ways to keep homemade chicken broth on hand and at the ready. (You didn’t think we were actually making a Chicken Broth Muffin, did you?)
Chicken Broth Muffin Cups (unfrozen)
Pour your homemade chicken broth into a regular muffin pan. Flash freeze for several hours. Remove the pan from the freezer and allow to sit on the counter long enough to loosen the Chicken Broth Cups from the pan. Place all the Chicken Broth Muffin Cups inside a large gallon sized freezer bag. Label it with the contents and date.
Frozen Chicken Broth Muffin Cups (Yes, that is a different pan.)
Each regular sized muffin tin cavity measures 1/4 cup. When a recipe calls for chicken broth, remove the amount needed from the freezer and throw it in frozen. Simple!

Cute Hard Boiled Eggs


http://www.facebook.com/pages/The-chicken-coop/223837250974228

Nutella-Peanut Butter Rolls

http://www.thebungalowblog.com/2012/03/nutella-peanut-butter-rolls.html


The recipe is quick and easy and starts with frozen bread dough.  It originally called for peanut butter, but I experimented and added Nutella! These days I can’t get enough of that stuff.
peanut butter
To make the buns or rolls, first push the thawed dough out into a rectangular shape and spread with peanut butter and powdered sugar or brown sugar. Just eye it up, I don’t know the exact amounts, but I used a little too much peanut butter.
I had 3 loaves of bread dough thawed, so I made 3 batches and have tons to give away. I hope we give them away and don’t scarf them down by ourselves, but sweets don’t last too long around here.
sugar peanutbutter
I sprinkled on the powdered sugar, but I think I like the taste of brown sugar better, so next time I’ll use that.
Next, roll it up jellyroll style and cut into 1 inch slices. Using dental floss to cut the dough is easier and neater than trying to slice it with a knife.
dental floss
Place the rolls in a 9 x 13 inch pan, cover with a kitchen towel or greased plastic wrap and let rise for about 30 minutes.  Don’t pack them in too tightly because they will rise more while baking.  Bake at 350 for 15 to 20 minutes.
xx2012_03_03_3808
Some rolls had peanut butter, some had Nutella and some had a combination of both.
After they cool, spread some cream cheese icing on top, or any icing you prefer. I used canned icing.
3buns
Pull them apart and enjoy. My favorites are the ones with Nutella.                         I♥Nutella.

Homemade Mayo

 
Must try!
First ever attempt at Homemade Mayo. The recipe is adapted from one in The Fresh Egg Cookbook by Jennifer Trainer Thompson. Adapted because I didn't have all the ingredients on hand and really wanted to try it this morning ! Oh and I gue...ss because of my Scandinavian background I feel compelled to put dill into everything !

I used 1/2 C olive oil, 1/2 C vegetable oil, 1 egg, 1/4 t salt, 1/4 t Dijon with Chardonnay, 1 T fresh lemon juice, 1 t dried dill, dash of white pepper.

I wish you all could taste it ! I'ts truly amazing.

http://www.amazon.com/Fresh-Egg-Cookbook-Chicken-Backyard/dp/1603429786/ref=sr_1_1?ie=UTF8&qid=1331140455&sr=8-1

S'mores Cake in a Canning Jar

http://www.facebook.com/Whatsfordinner2nite


S'mores Cake
for crust:

1 1/2 cups graham cracker crumbs

1/2 stick butter
...
pinch of salt

Preheat oven to 350 degrees.

Melt butter and mix in graham crumbs and salt. Mix until moistened. Spray 4 mason jars with non-stick spray and press graham crust into jars. I began by adding a tablespoon to each, and repeating until graham crumbs were gone. They don’t need to look perfect. I pressed the crumbs down firmly with the flat bottom of a clean screwdriver.

For cake: (from peanut butter hot fudge cupcakes)

1 1/8 cups all purpose flour

1/4 cup dark cocoa powder

1 1/4 teaspoon baking soda

1/2 teaspoon salt

3/4 cup brown sugar

1 egg

1 teaspoon vanilla extract

1/2 cup milk

1/2 cup + 1 tablespoon heavy cream

1/2 cup butter, melted

2 tablespoons sour cream

for topping:

1 bag of large marshmallows

In a bowl, whisk egg and sugar until smooth and no lumps remain. Add milk, cream, butter and vanilla, and mix until combined. Stir in sour cream. Sift dry ingredients together and add to wet mixture. Mix until batter is smooth. Using a 1/4 cup measure, add batter to mason jars one scoop at a time. You only want to fill them up about half way, and the batter should work evenly for 4 jars. Again – don’t worry if it is perfect. Place mason jars in a baking dish and add about 1 1/2 cups of water to the bottom. Bake for 30 minutes, or until cake is set.

Remove cake from the oven and press large marshmallows down on top, being careful not to burn yourself. There is no set number of marshmallows to use, I pressed down as many as I could, about 4-5 each. Heat the broiler on your oven and watching carefully, brown marshmallows for about 1-2 minutes, or until golden brown. Do not take your eyes off them! Serve immediately.

Cast Iron Skillet Cookies

 
Cast Iron Skillet Cookies
2 cups flour
1 teaspoon baking soda
1/2 teaspoon salt
3/4 cup butter, softened
... 1/2 cup sugar
3/4 cup brown sugar
1 egg
1 tablespoon vanilla
1 tablespoon heavy cream (or milk, half and half...)
lots of chocolate chips
(I use semi-sweet, milk, and dark chocolate)

1. Preheat oven to 350 F.
2. In bowl, stir together flour, baking soda and salt
3. In separate bowl, mix butter and sugars until light and creamed together
4. Add egg, vanilla, and cream and stir to incorporate
5. Combine with flour mixture until well mixed
6. Stir in chocolate chips
7. Press lightly into cast iron skillet
8. Bake about 35-40 minutes or until edges are golden
Don't overbake! Cookies will continue to cook in skillet

http://messythrillinglife.blogspot.com/2008/04/cast-iron-skillet-cookies.html

Are your eggs rotten? 1 quick way to tell...

http://www.organicauthority.com/foodie-buzz/how-do-you-know-if-your-eggs-have-gone-bad.html
eggs
Last week a buddy of mine rang me for advice. He was staring into a carton of eggs that had been in the back of his fridge for weeks, and there was no expiration date on the carton. “Kim!” he exclaimed, “how do I know if they’ve gone bad?!” The answer is simpler than you’d think. You don’t have to cook them, crack them, smell them, or shake them to find out if they’re still fresh. Nope, the answer is much, much simpler than that.
To test your egg’s freshness, place it in a pot of cold water. That’s it.
The fresher the egg, the more it will stay submerged, sunk inside the water, holding flat against the bottom of the pot. The less fresh an egg, the more it will swim to the top.
This advice first came to us by 18th century food writer Hannah Glass, and it remains just as true for home cooks today. But it seems too simple to be true. Is it just an old wives’ tale?
Actually, it turns out there is scientific truth behind the egg-in-water theory. An egg’s shell is ever so slightly porous, meaning that it lets small amounts of air pass through it. Once a fresh egg pops out of old Henny, it begins to slowly release water and carbon dioxide from inside the shell as small bits of air come in. Over weeks, the inside of the egg loses a bit of mass while gaining a bit of buoyant-providing air, and you are left with an egg that floats.
Here’s the basic rundown for how your eggs should look in cold water:
  • If just one to two days old, the egg will lay almost flat along the bottom of the pan.
  • When an egg is up to one week old, it will start to angle upwards a bit, but will still stay touching the bottom of the pan.
  • After about two weeks, the egg will start to stand upright, with most of the tip of the egg still touching the bottom of the pan.
  • If the eggs is a few weeks old, it will have a bit of bounce to it, bobbing a bit off of the bottom of a pan. The egg isn’t necessarily rotten at this point, but you’d be served well to serve it hard-boiled or baked pretty well.
  • Beyond about four to five weeks after the egg is laid, it will float completely to the top of the water. This is what you might call a “rotten egg.” Here’s a slew of unofficial suggestions from Recycle This for using those old eggs.
Sadly, I didn’t have this keen bit of information handy for my friend when he was testing out his eggs. My advice at the time: “If they’re less than a month old, they should be fine.”… not the worst advice, but it sure would have been backed up with the ol’ floating water trick.
Let us know if you’ve tried the egg-in-water trick for testing your own eggs

ALL ABOUT: Mead Making!!!

52 Ways to Eat Kale

http://www.dailybitesblog.com/2012/02/27/52-ways-to-eat-kale/

When the kale craze began gaining momentum a few years ago, I was thrilled. It’s one of my favorite ingredients and I eat it almost every single day. But like all good things, kale has become so old hat that many people I meet these days seem to be asking the same question: got any good ideas for using kale? I’m sick of green smoothies.
For those of you fighting kale fatigue, this post has your name all over it! I offer you 50 different ways to eat one of the world’s most nutritious vegetables. Try one recipe a week and you’ll be set for a year.

For the smoothie lover…


Peaches n’ Green Smoothie from Choosing Raw
Chocolate Sweet Potato Smoothie from The Daily Dietribe
Brilliantly Beet Smoothie from The Balanced Platter
Apple Pie Smoothie from Diet, Dessert, and Dogs
Green Smoothie from Lexie’s Kitchen
Vitamin C Plus Green Smoothie from She Let Them Eat Cake
Apple Ginger Kale Juice from Whole Family Fare
Sweet & Green Juice from Healthful Pursuit
 

Grains & Beans


Quinoa with Spring Vegetables & Walnut-Kale Pesto from Gluten-Free Girl
Chickpeas with Delicata Squash, Kale, & Coconut Milk from Healthy Green Kitchen
Quinoa Salad with Roasted Sweet Potatoes & Kale from Two Peas & Their Pod
Pan-Fried Corona Beans & Kale from 101 Cookbooks
Quinoa, Sweet Potato, & Kale Cakes from YumUniverse
Kale & Porcini Rice Pilaf from Daily Bites
Roasted Squash & White Bean Skillet from Daily Bites
Kale Salad with Quinoa, Tangerines, & Roasted Almonds from Gluten-Free Goddess
Slow Cooked Hoppin’ John from A Year of Slow Cooking

Salads & Vegetable Sides


Endive, Kale, & Smoked Salmon Salad from Healthy Green Kitchen
Dairy-Free Creamed Kale from The Whole Life Nutrition Kitchen
Cucumber Dill Kale Salad from Healthful Pursuit
Sauteed Kale with Tahini Sauce from Simply Recipes
Kale with Seaweed, Sesame, & Ginger from Simply Recipes
Rainbow Kale Slaw from Go Dairy Free
Raw Kale Grapefruit Salad from Tasty Eats at Home
Chipotle Kale Chips from Naturally Ella
Kale & Carrot Salad with Ginger-Peanut Dressing from Daily Bites
Individual Stacked Salads from The Whole Gang
Red Kale, Pear, & Celeriac Salad from Cannelle et Vanille (omit cheese for dairy-free)
Kale Chips from Whole New Mom
Healthy No-Mayo Slaw from Gluten-Free by Nature
 

Main Dishes


Creamy Fusilli with Beets, Kale, & Toasted Pine Nuts from Choosing Raw
Chicken with Cherries & Kale from Elana’s Pantry
Kale & Potato Lasagna from Diet, Dessert, and Dogs
Roasted Salmon with Kale, Tahini, & Cranberries from Cara’s Cravings
Gluten-Free, Vegan Spoonbread with Mess O’ Greens from Simply…Gluten-Free
Asparagus Stir-Fry from 101 Cookbooks
Kale & Feta Breakfast Casserole from Kalyn’s Kitchen (omit cheese for dairy-free)
Kale Salad Wraps from Lexie’s Kitchen
Savory Almond Bean Burgers from She Let Them Eat Cake
Easy Chopped Chicken & Vegetable Salad from Daily Bites
Lentil & Kale Dal from The Whole Life Nutrition Kitchen
Soft Corn Tacos with Salmon, Greens, & Pumpkin Seed Pesto from Daily Bites
Salmon Cakes with Quinoa & Kale from Celiacs in the House
 

Soups & Stews


Turkey & Winter Vegetable Chili from Daily Bites
White Bean & Kale Soup from Simply Sugar & Gluten-Free
Mighty Minestrone Soup from The Balanced Platter
Vegan Moroccan White Bean & Kale Soup from Go Dairy Free
Vanilla-Scented Buttercup & Kale Stew from Cara’s Cravings
Creamy Chicken & Vegetable Stew from Tasty Eats at Home
Lentil, Carrot, & Kale Soup from Deliciously Organic
Slow Cooked Tuscan Sausage & Bean Soup from Recipe Girl
Cleansing Winter Vegetable Soup from Phytofoods

A List of 5 Essential Medicinal Herbs for Spring

http://frugallysustainable.com/2012/03/a-list-of-5-essential-medicinal-herbs-for-spring/

Every breath is a giveaway dance
between you and the plants.”
~Susun Weed
So if you’ve been reading Frugally Sustainable for any length of time, you’ve probably noticed that I am borderline obsessed with herbs :) I love them for several reasons – they come from the Earth, they’ve healed for thousands of years, and they are amazing! And now with Spring on the way, it’s time to start thinking toward the days ahead. 

Preparedness is the name of the game when working with herbs, and as we prepare for warmer days – and an increase in the time spent outdoors – we can certainly anticipate many opportunities to care for bruises, cuts, scrapes, a variety of rashes, and bug bites.
Therefore, rather than relying on the commercially-prepared products that line the shelves of the local pharmacy…let’s take a look at some plants!
5 Essential Medicinal Herbs for Spring
Talk to 10 different herbalists about the most “essential” herbs to keep in stock and you’ll get 10 different answers. Medicinal herbs are just like that…everyone has there favorites. Here are mine :)

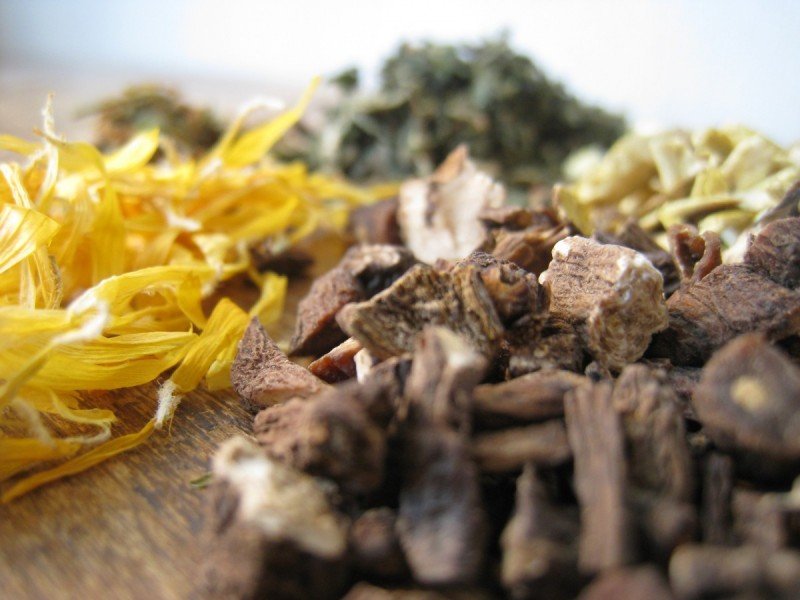
  1. CalendulaThis is one of the best herbs to use when attempting to treat ailments of the skin – such as cuts, burns, inflammation, bruises, minor open wounds, scrapes. Phytochemicals that are present in this flower work hard against bacteria, viruses, and fungi. Because of these potent properties, calendula can be used to treat and soothe sun-burned skin, ear infections, pink eye, diaper rash, bug bites, eczema, and acne. Interested in learning how to make a calendula infused oil? Read more here. And click here to learn how to make your own salve!
  2. Nettle LeafNettle leaf contains an abundance of natural antihistamines and touts many anti-inflammatory properties as well. Therefore, it is super effective in treating all of the symptoms associated with seasonal allergies — i.e. a runny nose, itchy, watery eyes, and sneezing. Nettle leaf is also high in essential vitamins and minerals. The best ways to ingest the goodness of this herb are through an herbal tea infusion or tincture.
  3. Dandelion RootYes I am referring to the little yellow flower that grows like crazy in our yards come Spring! The flower, leaves, and roots are each beneficial and work in different ways. The root of the plant is incredible when used as a liver and gallbladder detoxifier. Additionally, it is rich in a variety of vitamins and minerals. Used in tinctures and teas, this herb will detox, nourish, and revive the body after a long winter…it is the perfect Spring Tonic.
  4. St. John’s WortThe “feel good” herb, known for it’s ability to effectively treat the symptoms of mild depression, can also be used to treat neurological pain, tension, anxiety, and irritability when taken internally. Moreover, when St. John’s wort is used externally it is wonderful in homemade salves for the treatment of bruises, wounds, and especially good for treating sunburn.  
  5. Oregon Grape RootI love Oregon grape root! It’s broad-spectrum properties – anti-bacterial, anti-fungal, antibiotic, and anti-viral — make it a must-have for my herbal medicine chest. Use it in salves or as a poultice to more aggressively treat athlete’s foot, psoriasis, eczema, and acne. 
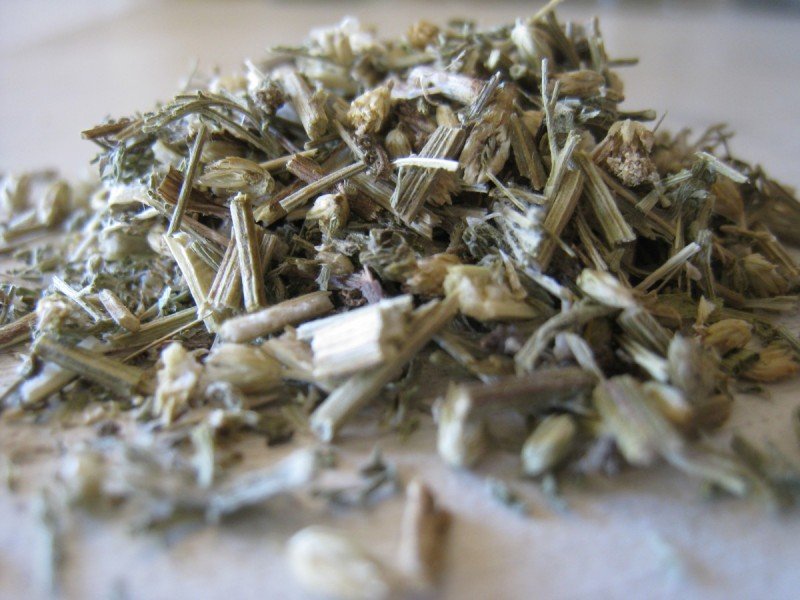
Bonus Herb: YarrowI had to include just one more :) Yarrow is great when used as a treatment for the flu and sudden fevers. One would be wise to always have yarrow on hand. A tea made from yarrow, although bitter (I make it yummy tasting for the children by adding peppermint leaf), will stop a cold and reduce a fever super quick! This is my fever-reducer of choice.

Notes
-An additional bonus to these herbs is their ability to grow in most climates and soils. During the later months of Spring and early Summer, these are herbs/weeds are easy to find growing on the side of the road or in our lawns…and they can be grown without difficulty in the backyard herbal garden.
-Want to learn more about medicinal herbs? These are just a few of the resources that have shaped my thinking regarding this practice:

Spring Cleaning Tips


We all love spring for its fresh and cozy weather. The chirping of birds, flourishing of flowers, refreshing fragrance fills our heart with peace and joy. But to enjoy that feeling, we have to spend some time on cleanliness and hygiene, to make your house get freshen up and get a head start on the seasons of spring and summer. Our superb and easy to use springs cleaning tip will help you make your house keeping workload not felt at all. You will get to know how to clean anything you have at home and I hope you will enjoy browsing our tips.
Let’s get started; Are the walls dirty?  Just follow these simple:

Tips for cleaning walls:

For cleaning interior walls you would need Wall cleaner, mix 1/2 c. ammonia, 1/4 c. white vinegar, and 1/4 c. baking soda to 1 gal. warm water. If you have a textured walls use nylon socks instead of a sponge or cloth to avoid leaving material chunks behind. You can tie a dust cloth over your broom and work from the top down, to dust wall paper. If you have naughty kids, who have filled non-washable papers with pencil marks and drawings with other non-greasy spots, use an art-gum eraser t remove that. You can also remove remove greasy spots or crayon by applying a paste of cleaning fluid and fuller’s earth and cornstarch. Let the wall dry and brush off residue. Repeat the treatment until the spot is gone.
For exterior walls Use a water hose to spray the outside of your house. This will remove siding cobwebs and dirt.
If you have textured siding, attach a car-washing brush to the hose to remove dirt.
Tips to Clean Windows:
You can make your own spray cleaner. Its easy.  Fill a spray bottle with 3 tablespoons ammonia, 1 tablespoon vinegar & the remainder with water. After that Dust blinds by wrapping a cloth around a ruler. Spray cloth with a dusting spray and run the flat end across each blind. After that shine the windows using an old newspaper. To avoid streaks, clean windows on an average temperature, preferably on a cloudy day. Dry windows outside in one direction then inside in the other direction so that If you see a streak, you will know which side is the mistake. To clean window sills, pour diluted rubbing alcohol on a cloth and rub the entire surface. Then dust off the sill with a clean cloth.
Tips to clean Bathroom:

If the bathroom mirror is not clean, to remove the dull haze, rub alcohol on the surface. Rubbing alcohol can remove the dull haze from mirrors. Rubbing alcohols also removes spots from bathroom fixtures. But for having a sparkling Glass shower doors, clean it with white vinegar. If the shower is dirty then use a solution of 1/2 cup vinegar, 1 cup ammonia, and 1/4 cup baking soda added to one gallon of warm water to clean it.
Water spots on metal frames are a great pain in the bathroom. To clean those use the Lemon furniture oil.
Rusty tile marks can be removed with kerosene. Running the shower on hot for five minutes will steam the dirt loose. To clean Grout Wash with 2 tablespoons chlorine bleach in one quart of water. Dry thoroughly, and then apply Several coats of lemon oil. Let dry one hour between coats. Dull walls will shine when washed with vinegar and water and polished with a dry cloth. Lighter fluid will remove most stains from porcelain sinks and bathtubs.
How to keep your kitchen clean:
Remove stubborn water spots from a stainless sink with a cloth dampened with rubbing alcohol. These spots can be removed with vinegar. If the stainless steel is rusty then rub stainless steel sinks with lighter fluid. For a sparkling white porcelain sink, place paper towels across the bottom of your sink and saturate with house hold bleach.  Let it rinse for 8 hour. Be careful and donot use bleach in colored sinks.
To fight with refrigerator odor keep an open box of baking soda. It will absorb odors for a month or so. Can also use a few drops vanilla extract on a piece of cotton placed in the refrigerator. This will eliminate odors.
Wipe refrigerator with vinegar to prevent mildew and Use your vacuum on the front of the coils and motor to remove dust and dirt from the refrigerator.
Appliances Care:

Yellowing of white appliances is a perennial problem. To stop that mix 1/2 cup bleach, 1/4 cup baking soda and 4 cups of warm water. Apply with a sponge & keep for 10 minutes. After that rinse & dry thoroughly. You can also use car wax to wax large appliances and make them shine. You can also use it to remove small scratches as well.
Wood Floors:

You can make your own floor cleaner. It is very easy to make. Make a solution of 1/2 cup of white vinegar in 1 gallon of warm water. Damp mop with a mop squeezed nearly dry. It is safer to mist the mop with the cleaner than to apply to floor. Do a section at a time and throw an old towel on the floor and scoot back and forth with foot to dry and prevent streaks. Standing liquid from mopping, spills, and pet accidents can damage floors.
The greatest damage done to wood floors is from grit. Mats at doors are necessary to collect grit and it’s important to keep these clean. Frequent dust mopping in high traffic areas to collect grit is the best prevention. This should be done based on the amount of traffic, which may require dust mopping several times a day in an active household. The brush attachment of a vacuum can be used (no beater bars). Felt and furniture protectors should be installed on furniture. Never scoot furniture on wood. Put a piece of waxed paper under your dust mop. Dirt will stick to the mop and the wax will shine your floors.
Removing Stains

Stains are our greatest enemies and to fight them is even easier if you are prepared.
Water Stains: Rub the spot with No. 2 steel wood and rewax. For more serious water stains, lightly sand with fine
Sand paper, clean the spot with No. 1 or 00 steel wool and mineral spirits or floor cleaner then refinish and wax.
Cigarette Burns: If not severe, the burn can be removed by rubbing with steel wool moistened with soap and
water.
Heel and Caster Marks: Rub vigorously with fine steel wool and floor cleaner. Wipe dry and polish.
Ink Stains and Other Dark Spots: Use No. 2 steel wool and floor cleaner to clean the spot and surrounding area.
Thoroughly wash the affected area. If the spot remains, sand with fine sandpaper, re-wax and polish. Stubborn
stains may require that you replace the affected area.
Chewing Gum and Wax Deposits: Ice until the deposit is brittle and crumbles off. Pour floor cleaner around the
stain so the fluid soaks under and loosens it.
Alcohol Spots: Rub the spot with liquid or paste wax
Tips to keep Carpets Clean:

To clean dry spots, loosen soil and vacuum away prior to moistening it. When taking out stains, always use a white cloth. If you have dropped Wax  on carpet or upholstery and want to clean it then set a clean, absorbent cloth over the wax stain and hold a hot iron on it. Then remove the cloth. Coat mildly greasy stains with aerosol shaving cream, use a hair dryer to speed dry. Then vacuum. Sprinkle a greasy stain with baking soda, cornstarch or talcum powder. Leave on at least 8 hours, and then vacuum. The works done.
Apply these simple and effective tips and have a happy spring!!

Followers